The new inline text prediction in Pages can be a useful tool once you know how to use it.

Pages users may have recently noticed the app trying to predicting what you’re trying to say. Equally so, you might find yourself wondering how to get this feature working in your Pages app.
In recent updates to Pages, the inline text prediction feature was added. It joins a host of other Auto-Correction options that can make Pages just a little more convenient to use.
How to enable inline text prediction in Pages
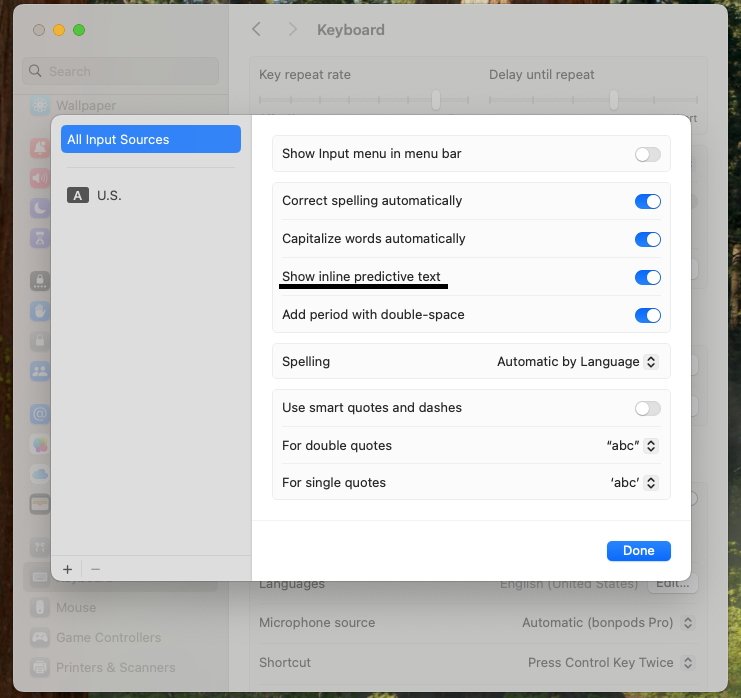
The first step to actually using inline text prediction is to make sure you have it enabled. This is actually a system-wide setting on macOS.

Inline predictive text can only be enabled on a system-wide level.
- Open System Settings.
- Navigate to Keyboard settings.
- Beneath the Text Input heading, select Edit
- Enable Show inline predictive text.
This setting will enable inline predictive text in compatible apps system-wide on your Mac. But most importantly, this will allow you to take advantage of inline text prediction in Pages.
How to use inline text prediction in Pages
Actually using inline text prediction in Pages is easy enough. While typing out a sentence, you’ll see a finished word or phrase appear in slightly faded out text.

Text prediction will always look the same, no matter what color font you’re using.
To actually use this prediction, you need only press tab, space, or enter. Any one of these options will fill in the predicted text, and jump you to a space ahead of the prediction.
If the prediction presented to you isn’t exactly what you’re looking for, you can simply keep typing and the prediction will vanish.
How to use Pages’ other Auto-Correction options
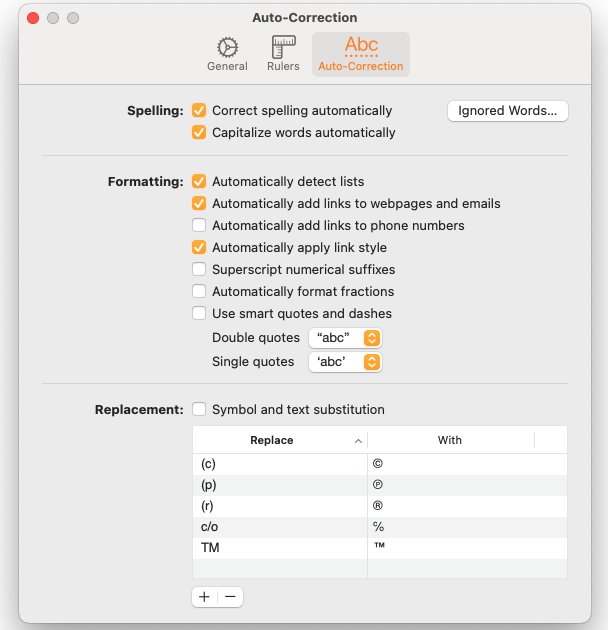
Alongside this inline text prediction, Pages actually has a whole host of useful Auto-Correction options. These options include:
- Correcting spelling
- Correcting capitalization
- Automatically detecting lists
- Automatic hyper-linking for URLs, email addresses, and phone numbers
- Automatic fraction formatting
- Using smart quotes
- Text replacement
Some of these features are the most basic of autocorrect features, while others are a little more advanced.

Pages has many Auto-Correction options for various uses.
Text replacement, for example, allows you to replace certain characters with more advanced symbols that aren’t as easily typed. Pages offers a few replacement options by default, such as replacing “(c)” with the correct ‘c’ in a circle that means copyrighted.
The actual replacements can be customized within Pages’ settings.
- Open Pages.
- In the Menu Bar, click on Pages.
- Select Settings.
- In the settings windows, click on the Auto-Correction tab.
- Beneath the Replacement: heading, click the “+” button.
- Fill in the Replace column with the text you’ll type out.
- Fill in the With column with the replacement text.
With inline text prediction alongside Pages’ many Auto-Correction options, Apple’s default writing app can be a very useful writing tool. And with the ability to modify your Auto-Correction settings, you can customize its usefulness to your exact needs.


