Auto-empty trash every 30 days on macOS.

The Mac’s Trash stores files until you remove them from your drives. Here’s how to empty the Trash automatically in macOS Sequoia.
The Trash has been a part of the Mac’s desktop design from the beginning. Using a real-world metaphor, when you want to delete files you can drag Finder items to the Trash icon in the Dock, or move them there by pressing Command-delete on the keyboard. Emptying the Trash automatically can help free up disk space.
Auto-empty Trash
Years ago Apple added the ability to empty the Trash automatically after thirty days. This setting is off by default. To enable it:
- Go to Finder->Preferences.
- Click the Advanced tab.
- Toggle Remove items from the Trash after 30 days.
Turning this setting on will remove any items moved to the Trash after thirty days has elapsed.
You can move trashed items back to where they were originally by opening the Trash in the Dock, Control-clicking on the items, then selecting Put Back from the popup menu in the Finder.
Normally, if you move items to the Trash they will stay there indefinitely until you select File->Empty Trash from the Finder’s menu bar.
Moving items to the Trash (but before you Empty Trash) moves them to a special folder in the macOS filesystem named “.Trash” inside your user folder.
Note in macOS Sequoia the actual Trash folder is hidden in the Finder even if you have hidden file display turned on.
To delete items on the Desktop in Finder immediately without moving them to the Trash:
- Select the items on the Desktop you want to delete by clicking on them.
- Hold down the Option button on your keyboard.
- Select File->Delete Immediately….
Now also in System Settings
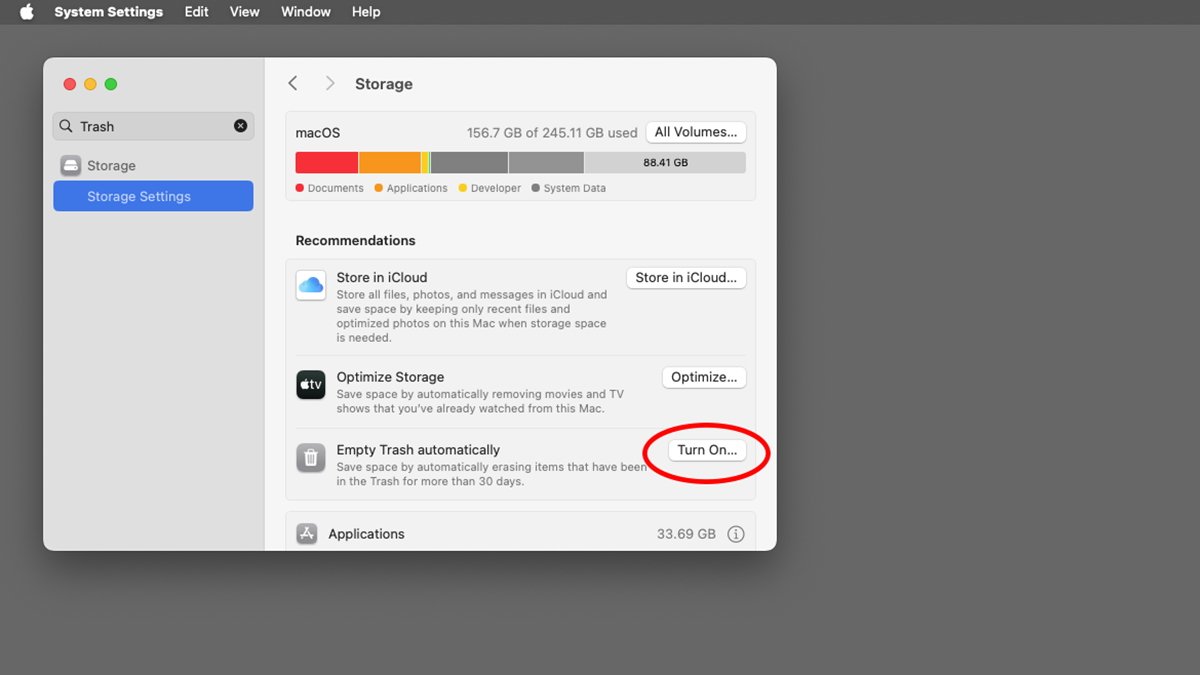
While auto-empty Trash has been around for years in Finder->Preferences, in macOS Sequoia Apple has now also added the feature to the System Settings->General->Storage pane.
If the setting isn’t already turned on, it will appear under the Recommendations section with button labeled Turn On in the Empty Trash automatically section:
 Click “Turn On” to enable automatically emptying the Trash in macOS.
Once you flip the switch in this section, a green checkbox will appear in place of the toggle switch. Also note that you can’t turn auto-empty Trash back off from here. To do so, you’ll need to go to the Advanced tab in Finder->Preferences and turn it off from there.
As a footnote, moving files to the Trash doesn’t invoke the Mac’s direct filesystem API because of the Put Back feature. Instead, when you move items to the Trash it sends a message to the Finder to move the items.
If for some reason you want to move files to the Trash and bypass Finder’s Put Back feature, check out the third-party command-line tool trash from asseg.org.
Auto-emptying the Trash isn’t anything new in macOS, but in Sequoia Apple has added a little reminder in the Storage pane just in case you forgot to turn it on in Finder preferences or in case you didn’t know it existed.


